Honda CR-Z Hybrid Car Forums banner
41 - 60 of 143 Posts
Discussion starter · #41 · (Edited)
OBDII port

OBD-II port wiring modification
.
You may not need it. But
if your flashpro for civic si ecu doest recognize your si ecu or doest upload a map and you get error “NEP connection' error” it’s because CRZ uses CAN 29 bit system where as Civic Si uses Iso 9141-2.
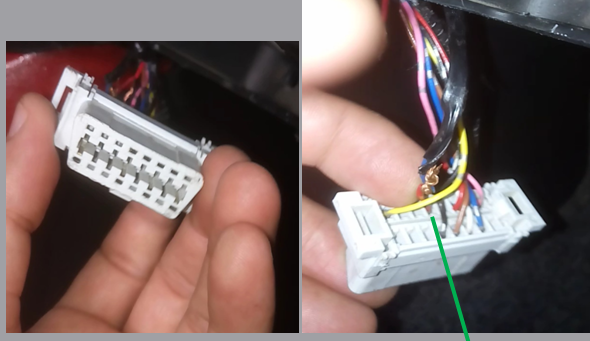
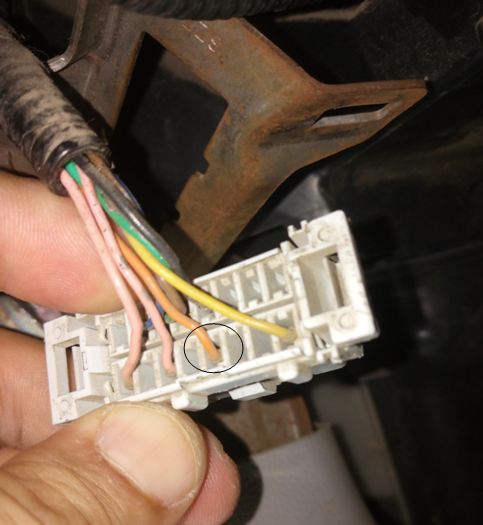
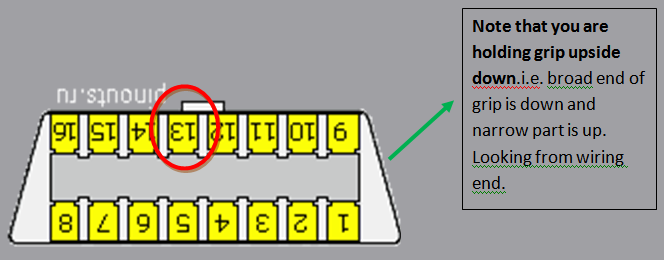
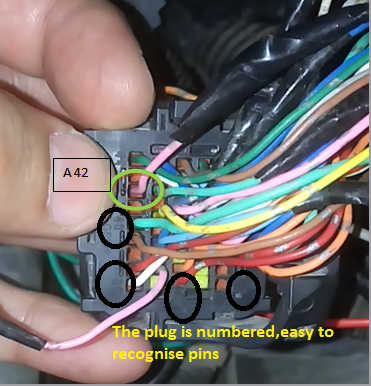
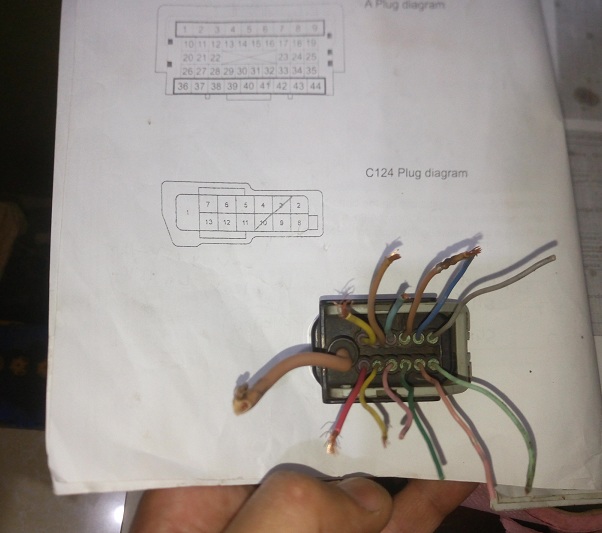
Here is OBD II port out from it location for easy access and wiring. You will need to cut just one wire at position 13 and attach a wire to it and pass that wire all way into engine bay and to ECU A plug A-42 location (WEN signal wire).And you will solve the problem :smile2:
Picture of My Fit OBD-II port.
Image


Picture of CRZ OND-II port. CRZ OBD-II grip extracted from its location.
Image


Image


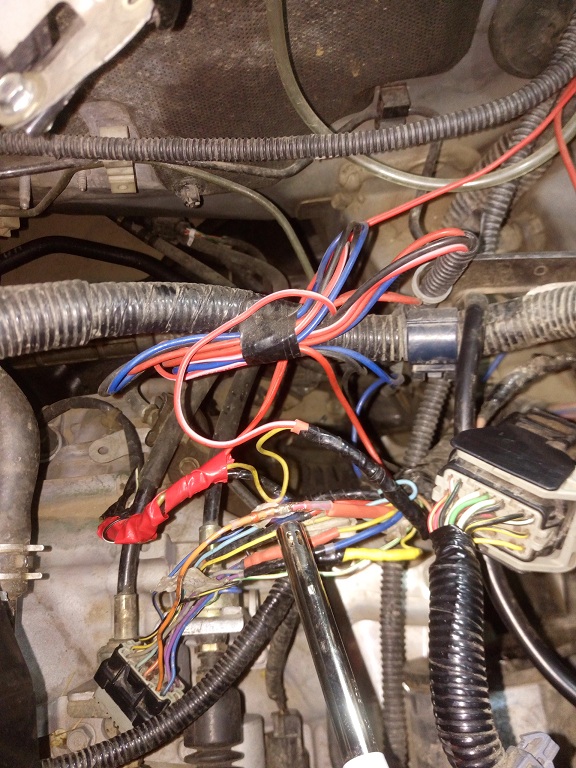
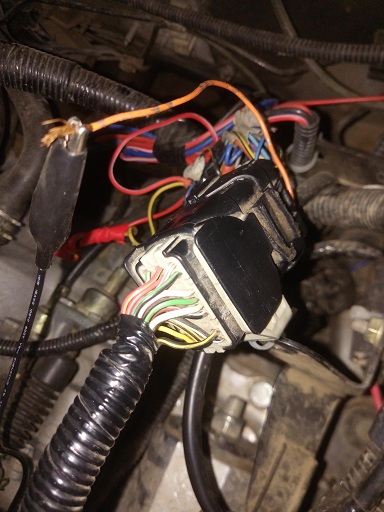
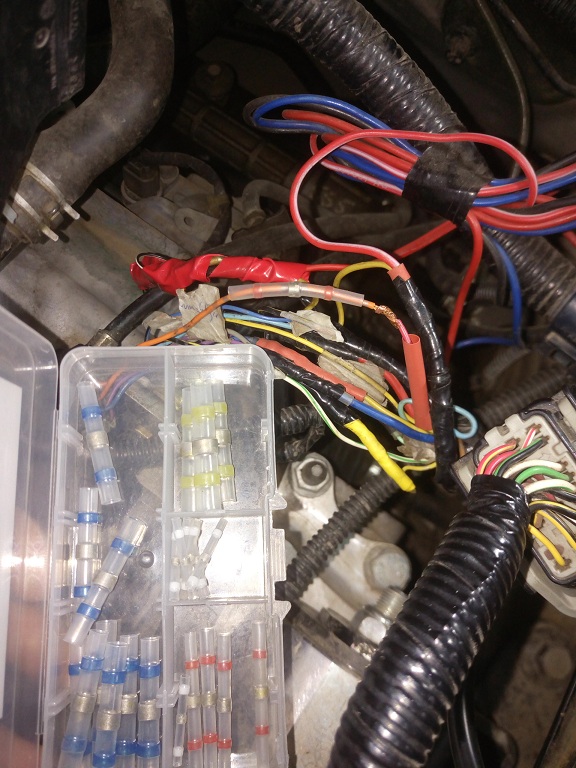
Wire passed from Pin 13 of OBD-2 to Plug-A 24 wire. Cut the A42(pink color in a Fit but may be Orange in CRZ) wire.no need to do to its other cut end. Similarly no need to do anything to OBD-2 wire 13's other cut end.
Image


OBD-II port pinout if some one may need it
Image


Note: If we trace the wire we cut (13) from OBDII to ECU,It comes at Plug-A 19 position. So what happens now as we cut this ? The radiator fans auto control is impaired.To eradicate this problem you will have to Enable option "Use Primary coolant sensor to control radiator fans" in Flashpro/ktuner.
Or you can upload a map and than join this wire again. or make a on/off switch for this wire,so when you upload a map it joins with A42 and when normal,it joins with A19.
This as i said earlier is not problem with prior to 2012 models. My Fit 2012 had this but in my CRz 2011 i didt need to cut this OBDII 13 wire to upload map. So this depends upon your car.
 
Discussion starter · #42 · (Edited)
The main wiring

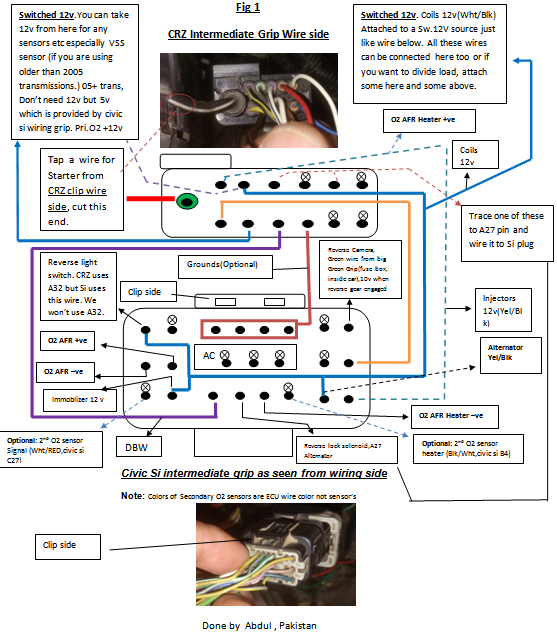
Without further delay lets complete the main wiring now. bear with me on this to end. Dont think its hard to do. This diagram took me almost two months to make, with checking sensor wires back to back along with voltages to confirm. But here it is simplified & complete now.Now its all sorted out and tested.May Allah help me making this easy for you guys.
I have revised and refined this process in my video series guide. the part 14 discusses it.
Here is how it looked like when started.
Image


Now it looks like this.Neat and ready for follow.This is the main diagram which will allow you to connect two plugs. CRZ124 plug and civic si 101 plug.
Image


Showing which grip is which
Image


Lets name the grips to be clear.
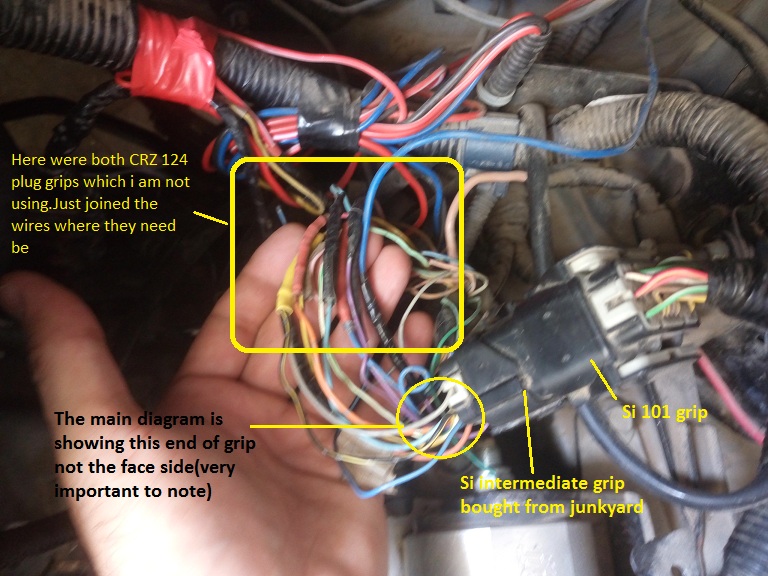
One is CRZ 124 grip (chassis side)
Image

One is CRZ 124 grip (engine side side) i name it CRZ intermediate grip
Image


One is Civic Si 101 grip (chassis side)
One is Civic Si 101 grip (chassis side) i name it Si intermediate grip

If you have junk yard nearby good for you. Becuuse we are missing Si intermediate grip. and it cannot be found online becuase its part of a car chassic wiring which remains in the car mostly.and whole chassic wiring will go like 250$.that too much of a price to pay when all you need is one grip.
Image

So if no junkyard access,than you can skip this grip and join the Si engine wiring grip directly to CRZ.
A question Why dont we join all the wire togahter? why need some type of grips?
Answer: Very good question Bob, the wires can be joined directly but some time in future the engine needs to come out for some upgrade or maintainance than you will have to cut the wiring, but if you use atleast two grips than engine can be disconnected from main wiring by un-plugging these plugs.
So basic requirment is to use atleast two grips. Either you can skip both crz grips and join their wires to Si grip. But than you will have to use both Si grips and vise versa.
I have cut my crz 124 grip after i figured and labelled the wires. I am using only Si grips for neat and clean installation. But most of you have both CRZ grips and one Si grip. So instead you can skip both Si grips and just use two CRZ 124 grips.
Image

The Civics 2008+ almost all have 101 grip.So its very easy to find in junkyards or wiring salvage shops.
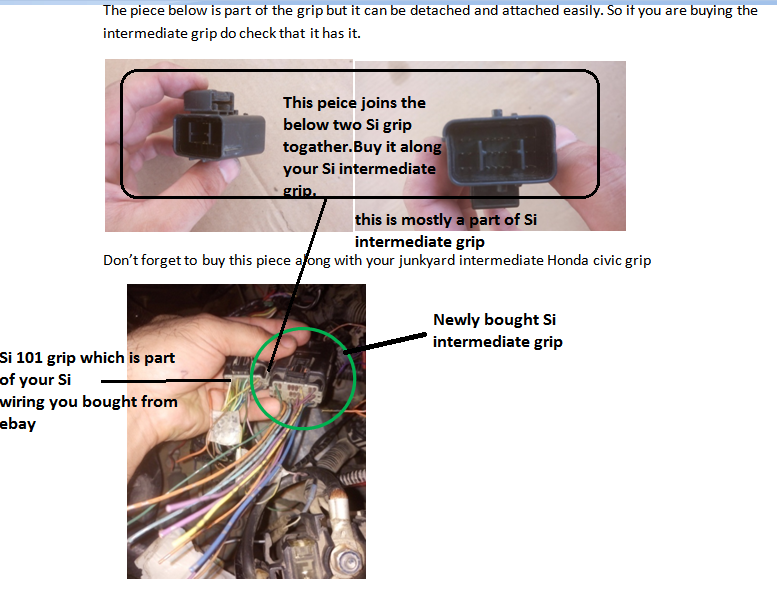
The piece below is part of the grip but it can be detached and attached easily. So if you are buying the intermediate grip do check that it has it.
Image


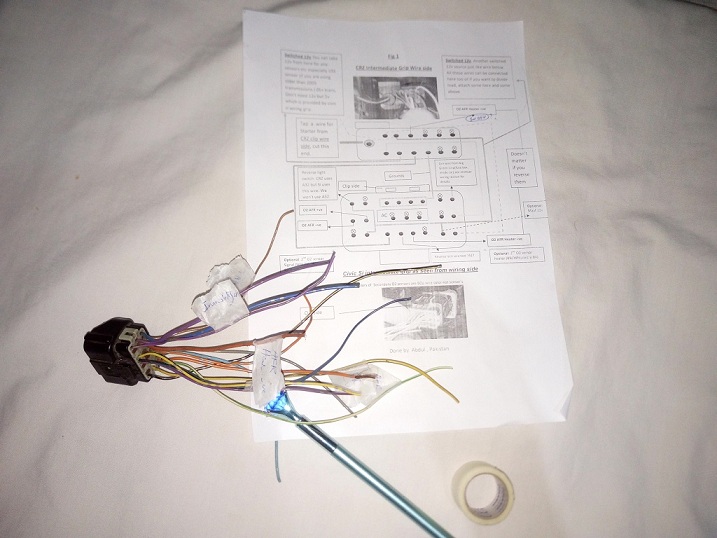
My Si grip ready after labelling
Image


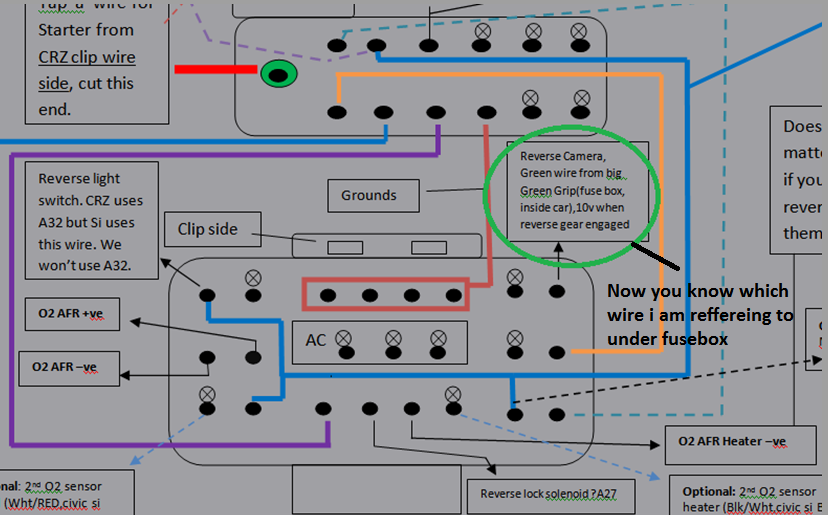
Lets discuss the main diagram here. It is showing wiring side (not the grip face but the portion where wires are entering the grip)of CRZ 124 engine side grip and Si intermediate grip.
The main things needed for our wiring is
Switched battery volts(i will reffere to 12V) to
1:Ignition coils
2:Injectors
3 primary or upstream or AFR sensor (Must) and secondary O2 or downstream sensor (optional)
4:Reverse cam
5:Immoblizer
Its simple. 1st you will check in crz 124 grip which wires have switched 12v. usually 3-4 wires will have it.
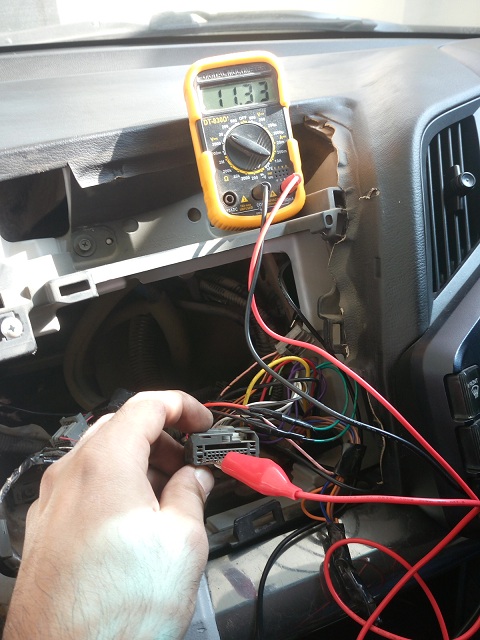
To check switched power source: Connect black wire of voltmeter to battery -ve terminal or car chassis(any bolt or un painted metal) and connect the red(+ve) wire to the wire/pin you are checking.Voltage should be zero at this time.Now turn ignition to 'On" or 'II' position.(the position just before start),if it shows 12v(battery voltage),its a switched power source.
If it shows 12v even before the switch was on than its a constant power source which we do not need.(attaching a sensor to a constant power source will drain your battery when car is off.so be careful between swicthed and constant 12v sources.
Below pic is an example of how to check.I am inside car,so battery is far away.So i have attached black wire to car body bolt(ground) and i am checking switched power in immoblizer grip.
Image


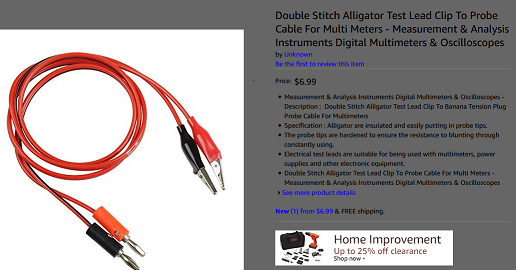
As you can see in picture,some time the grips have too narrow holes so that we cannot insert the end of the.A crocodile /allegator test lead costs 5$ on amazon.
Image

Order these with your voltermeter too.
Image


Now that you have tested the switched power wires in c124 plugs, its your choice how to distribute load evenly on those wire.For example o2 sensor heater takes a lot of voltage,so i gave it seperate wire. I joined reverse cam,immoblizer and other wire to a single switched 12v wire in crz124 grip.So its your choice. This diagram can also be used for Honda Fit/JAZZ, Fit hybrid Gp4 version) and many more.General principal is simple. We need switched 12 volts to above mentioned wires. same goes to 2013+ CRz's. Just check by voltmeter 12v switched wires in c124 grip. join the wires as you wish to divide laod evenly.
O2 sensors heater wires can be reversed. Usually they are black color.
For secondary O2 sensor if you need that for your emissions, Or you can use a universal catalytic converter for emissions and disable Sec.o2 sensor in flashpro.
One wire shown in diagram is of four grounds connected to a single ground wire in c124 plug.Its also optional. Coils have their main grounds some where else.But having more is always nice especailly the grounds.

One more wire is The ETCS relay signal wire. I say it Drive by wire .Its a must.Its location is same in 2012 Fit and upto 2012 Crz's. For 2013+ CRZ if you are not sure which wire in CRZ 124 grip is DBW.
To trace and confirm DBW wire:
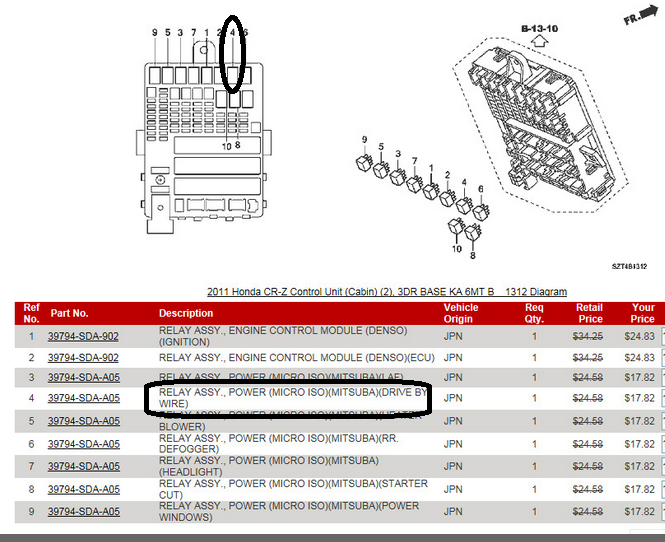
DBW wire leads to under steering Relay switches. Its location is 4th relay.
Image


Remove this relay and Connect a wire to it and connect other end of it to your voltmeter black or red wire(doest matter). Set your volt meter to continuety test/buzzer mode. Connect other end to crz 124 wires till Buzzer sounds. That will confirm DBW wire. Watch some vids on youtube how to do continuety test with voltmeter.

I have labelled Primary O2 sensor as AFR +ve and AFR-ve. That means the signal wires of it. Heater wires are simply labbled as AFR heater+ve and AFR heater -ve. Similar is with 2nd o2 sensor.
i will do a seperate post about O2 sensors.

One other wire is Alternator(yel/Blk color). It is needed for battery charging and if not connected the battery charging light on your dash will not go off and it wont charge the battery. Its easy to figure out.Just join this wire to the 12v switched wires one by one till battery light in dash extinguishes.
Dont connect it to a ground wire.( Check the groung 1st and label it.) we want to stay away from it.
Image


Keep all 12v wires insulated and away from ground wire.(there is only one or two grounds in c124 grip).

AC wire not need connected here. The AC compressor will take its ground from CRZ chassis wiring at its location.You may need to modify its grip there.

The reverse camera wire
You will need to pass a wire from firewall and join it to under dash fusebox bog green grip.I will discuss that in later post.Other end will join the wire according to diagram.

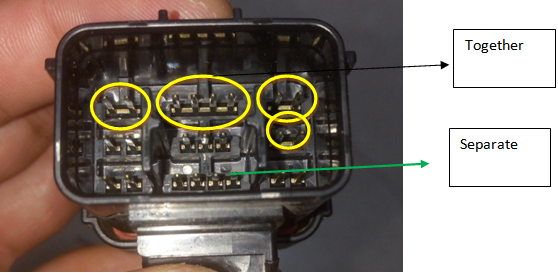
Do also note that this intermediate grip from Si has some wires inter-connected with in grip. here look in pic below
Image

So you dont need connect to all these wire if you need. Just one wire will suffice.
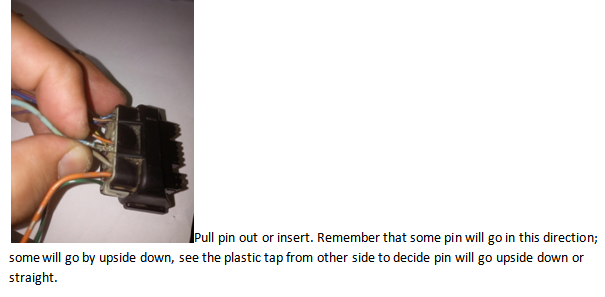
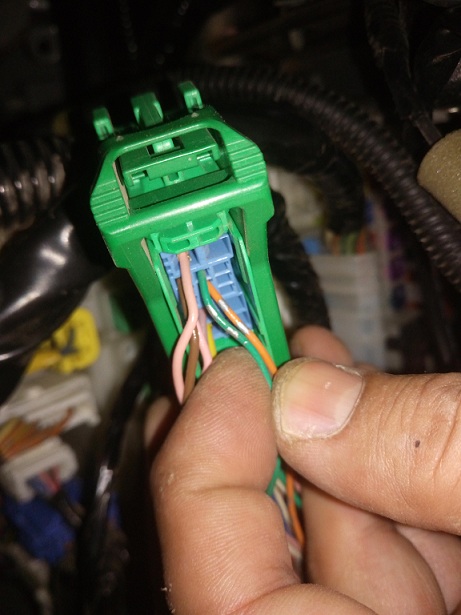
If you need change location of pin within grip,Method is simple and common to most sensor grip wires too.Most need to remove a plastic cover inside grip to unlock the pins.


Image


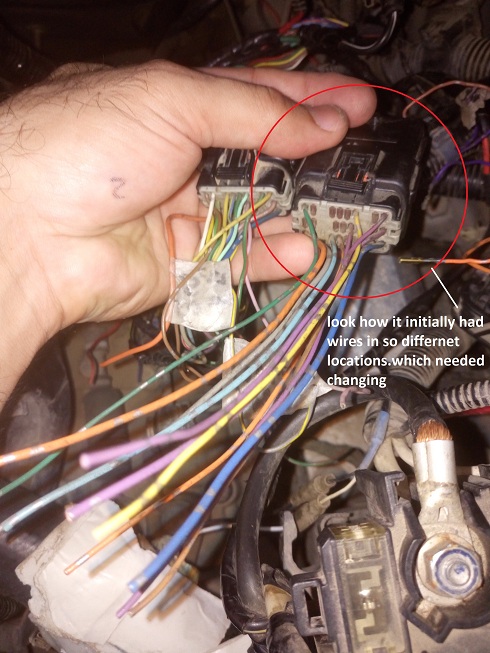
When final wiring was done,it looked like this.Some wire changed the positiones,some removed. Not much wire needed.
Image


Initially it had wire in differnet locations
Image


And this covers almost 90% of our wiring. my fingers are numb with all the typing.
The clearer version of the main diagram and other can be found in this folder i sharred.i will keep adding into it.
K-Swap Diagrams and Videos

 
Discussion starter · #43 ·
In Nutshell: This diagram was made keeping in mind both grips, so that wire recognition is easy. You can use any male/female grips even universal ones which have at least 10-12 wires. The purpose is to joins wire together. No rocket science. If you want to save both your CRZ grips and don’t want to buy Si 101 grip either, its fine. Just buy/find some male/female grip which has 10-12 wires in it. You can even choose not to use any grip and join wires directly. But in future if engine needs to come out of car, you will have to cut wires. so better use some type of grip/connector so that wire can be un-plugged there when needed.
Example of universal grips/connectors
Image


Image


Do remeber to labell them with a paper tape and a pointer/marker
Image

To join wires togather is easy.
1st heat up rubber on end of wire so that it can be removed easyly
Image


Quickly remove the rubber before it colds down
Image


Pass a heat shirink soldering connector and a heatshrink rubber sleeve onto wires.(sleeve should be bigger,so it can be slide over at end)
Image


Tei wires togather and slide the connector over them and heat up
Image

Image


Heat up the rubber sleeve and you are done.only one can be sifficient.
Image
 
Before we move on, just wanna check if civic si's ECU supports all the interior control such as dashboards and most importantly the air conditional?

I saw rushbucket's build previously doesn't have working air cond.
 
Discussion starter · #45 ·
O2 sensors

Before we move on, just wanna check if civic si's ECU supports all the interior control such as dashboards and most importantly the air conditional?

I saw rushbucket's build previously doesn't have working air cond.
Yes Ac works excellent.The Rustbukcet intenstionally deleted his AC as he did't need it.
All the dash works inlcluding OBD-II port,every control in car.
The traction control will not work in car who's converted from CVT to manual. Cruise controll also will not work in CVT to manual conversions. ABS works in all cases as it has seperate control unit.
Si ECU also adds some very nice features like two step launch controls, dynamic launch control.anti lag( those shooting flames from exhaust and pops) and many more.

Now back to the build. two more things before we officially say the wiring section is complete.
1:O2 sensor
2: Immoblizer wiring/configuration plan.
3:Optional: VSS sensor wiring if you are using transmission older than 2004.(rare case)

The CRZ and Si both use wideband Primary O2 sensors and narrow band secondary O2 sensors.
I have not tried but i am 80% sure the same CRZ sensors can work for Si ECU in K-series swaps.
I ordered Civic Si O2 sensor(i used only Primary O2 sensor.as no emission regulations here,so i dont 2nd O2 sensors)
Primary O2 Denso 234-9076 Air Fuel Sensor(AFR) also called upstream sensor,buy original denso,cheaper ones are like 45$ but original is like 110$.(no compromise here)
https://www.amazon.com/Denso-234-9076-Air-Fuel-Sensor/dp/B007MD0LGG
For users who want to use secandary also.
Automotive-leader 234-4358 Downstream 4-Wire Oxygen O2 Sensor Fit For 2006-2011 Honda Civic DX EX EX-L LX Si 1.8L 2.0L l4 36532-RRA-004
https://www.amazon.com/Automotive-l...otive&ie=UTF8&qid=1537685165&sr=1-2-fkmr1&keywords=civic+si+k20z3+o2+downstream

All above are of 06-11 Cvic Si. For 2012-2015 search and order accordingly

The CRZ uses its chassis wiring to supply o2 sensors. Si uses plug 101. I have included the wiring in main diagram. One thing remains.
As O2 sensors compromise of four wires.How to know which wire is of signal,which is of its heater and which is ground.
The ehater wires are usually black.and polarity does't matter.You can connect _ve to +ve and vise versa.it will work.
Now remains the signal +ve and signal -ve wires. The signal +ve is usually Blue/light blue and Signal -ve is white.(these are Primary o2 sensor colors ).
But to sure,there is a simple test.
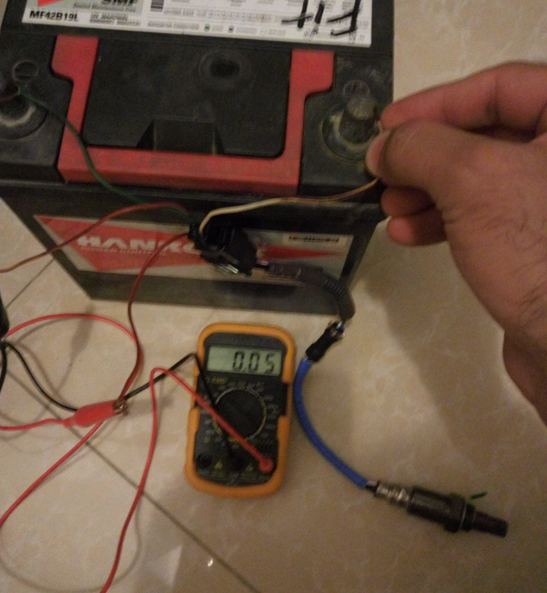
Fist confirm that you have connected the right terminals i.e. +ve to +ve and –ve to –ve. You will connect you black wire of voltmeter to ‘Com’ position and the red to mA or Ohm sign. In the figure battery voltage is in +ve meaning the connection is correct. If reeasing was -12.38,that would mean that i have connected them in reverse polarity either at battery terminels or in voltmeter.
Image


Now connect the signal wires to voltmeter +ve and -ve terminel. and than connect the heater wires to the battery.(heater wires can be revered)
Image


If the reading you get in voltmeter is in +ve than the wire connected to the +ve side of voltmeter is AFR+ve signal wire and the other one is AFR-ve signal wire.Labell them here.

If you get the -ve reading than the its opposite to the above.means yyou have connected the signal wires in reverse polarity.(Now you see why it was so important to correctly check voltemeter wire polarity 1st,becasue in this test polarity matters)

Image


If you dont have a spare battery lying around,dont worry. Simply connect the voltmeter wire to the wire you suspect are signal wire.Than heat the tip of O2 sensor with a lighter flame. If you get reading in +ve than the wire connected to Red(+) wire of voltmeter is Signal+ve wire and the other is Signal -ve wire and vise versa.
Image


Now that you are sure about the wires.Lets have a look at the O2 sensor connectors.
Honda uses both female and male O2 sensor connectors. The sensor you order from ebay/amazon may come with connector not matching to your crz wiring connector.
So I advise doing both connectors wires by your own. i have found good connectors from Ali express. You can search similar from amazon/ebay. But remember to order both male and female.
Image

https://www.aliexpress.com/item/fac...0set-GM-4-pin-connector-for-honda-O2-sensor-male-and-female-new/1729032923.html

You will need only 2 (4 if you want to use 2nd O2 sensor too) connectors but this has like 10. so extra is better as you will waste some pins and connectors in learning how to pin them. I recommend using slightly thicker wires for the heater wire(the black ones) ass they draw more cuurrent.
The method is again same.Remove white plastic and extract or insert the pins.In picture below i am holding the connectors of Si primary O2 sensor.Note the one i bought from junkyard ia also female.
Image

O2 sensor connector cut and replaced with after market one(from aliexpress i bought).
Image

This all avoids extra connections of wires.I may have cut the wires of connectors and attached a male connector but that would put too much joints in wires.which is not good thing for O2 sensors.
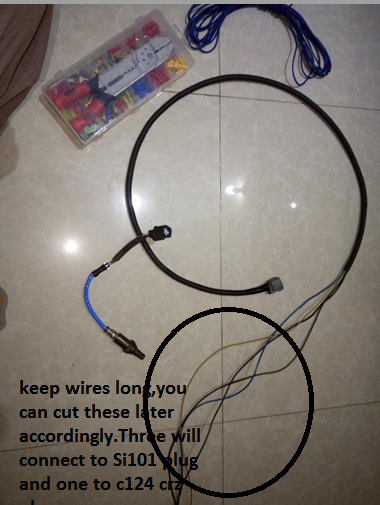
Here is my final wiring for primary O2 sensor. I will cut extra length of wires when I install them to headers.ready to be wired to main wiring harness.three will join Si101 plug and one (heater +ve or -ve) will take current from c124 CRZ plug
Image


No joints in wires. I just cut the original connector of O2 sensor,exposed the wires, crimped the pins on the ends of cut wires and pin them to after market connector. Similarly I took four long wire(heater wire are thivk) and crimped pins to ends of them and put them to connector.(opposite to O2 sensor connector,if you used female there ,use male here) .

A question: I ordered both primary and secondary O2 sensors and now i have mixed them.cant tell which is who.How to differntiate now ?

Its simple.The Primary sensors are wideband and operate from 0-5 volts. Where secordary sensors are narrow band and operate between 0-1 Volts. So as shown above test with voltmeter by heating the O2 sensor with lighter,if reading at voltmeter exceeds 1 volt(will be usually2-3v) its Primary sensor.If it remains under 1v its secondary.
 
Discussion starter · #46 · (Edited)
Immoblizer wiring/configuration

As i mentioned earler its better to buy the Civic Si ecu that has immoblizer and its key with it. Preferbly demand the seller to send matched key so that no configuration is needed. But from experience i have learned the key which come with the ECU is nor matched. Without immoblizer(trasnponder) and key matched your car wont start and will show immoblizer sign(green key on dash will be blinking continuesly ). So you have few Options
1:Take the car to Honda dealership(best option)
2:Immoblizer delete by using K-tuned box.(200$) not safe for sake of thefts.
Immobilizer / Multiplexor Bypass
3:K-pro has option to disable it but we are using flashpro which does not.I think Ktuner has it.One more reason to go for k-tuner. again not safe for sake of thefts.
4:After market keymakers/Scanner.
Launch scanner or autoland both work and do job perfectly.
Very Important: If you have keyless entry, the VIN number in your new ECU should be edited via scanner to your cars original VIN number written on chassis.(It will be starting like Zf1 or Zf2 etc etc there is also a dash included,remeber to also write that dash in VIN number for example ZF1-34523), the reason because your ignition switch is linked to MICU( Micro integrated Circuit Unit) which has your car original VIN number. you if you dont do this step, keyless entry will not work.
When you programm the immoblizer only in ECU without editing the VIN number , you can start the car becasue ECU has been programmed but keyless will only work after editing the VIN number.
So i recommend edit the VIN number 1st before even programming the ECU, becasue if you programm ecu 1st than edit VIN number for sake of keyless entry, you will have to programm ECU again becasue VIN has changed.
 
Discussion starter · #47 ·
Reverse camera

Reverse camera wiring :
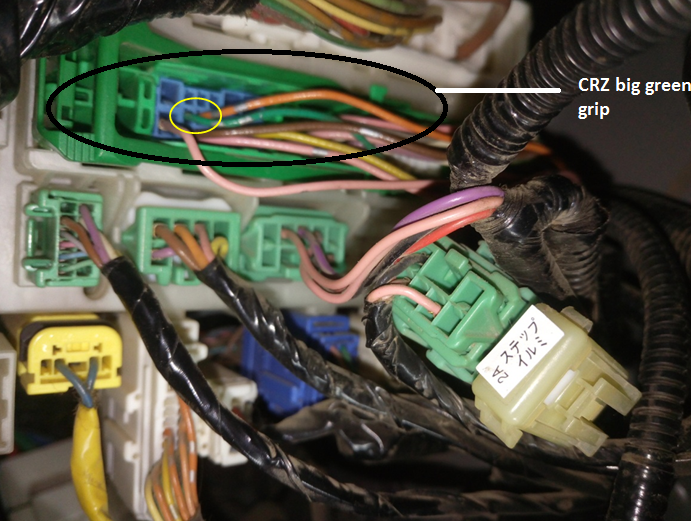
We all know rear visbility is quite low in CRZ so reverse cam is a must. But you have to add a wire for it so that you OEM reverse camera will work. I am sure this will give some back cramps because of location of big green grip under fuse pannel and working on it:p
Locate this big green grip and this green wire.Honda Fit below
Image


CRZ's big green grip and green wire.
Image


Locate the green wire.
Image

Image


Just bring a long wire from under hood main wiring as shown in diagram and tap it to this green wire.
Image
.

Yaaar officially our wiring is done. To add after market guages wiring i have found a great power source which contains a 12v constant source,a 12v switched and a ground.Perfect.
Image


Lets not discuss after market guages wiring.Or you people want i can share that.But remebr to pass some extra wire from firewall hole(from which factory wires are coming out in engine bay).becasue when engine is out,its very very easy. Pass after market guages sensor wires,immoblizer wire,WEN wire of OBD-II if you maye need it later and few extra. You can pull un-used later of not needed.
Image
 
Discussion starter · #48 · (Edited)
VSS/vehicel speed sensor wiring

Vehicle speed sensor/Counter Speed sensor/VSS

Again a big optional but a must step if you are using a transmission older than 2004.which will be rare case but as you know Honda cars have a quite long life.So these transmission are also there, even now.(and especially in Pakistan we get older ones,so most of this will help my Pakistani fellows.)
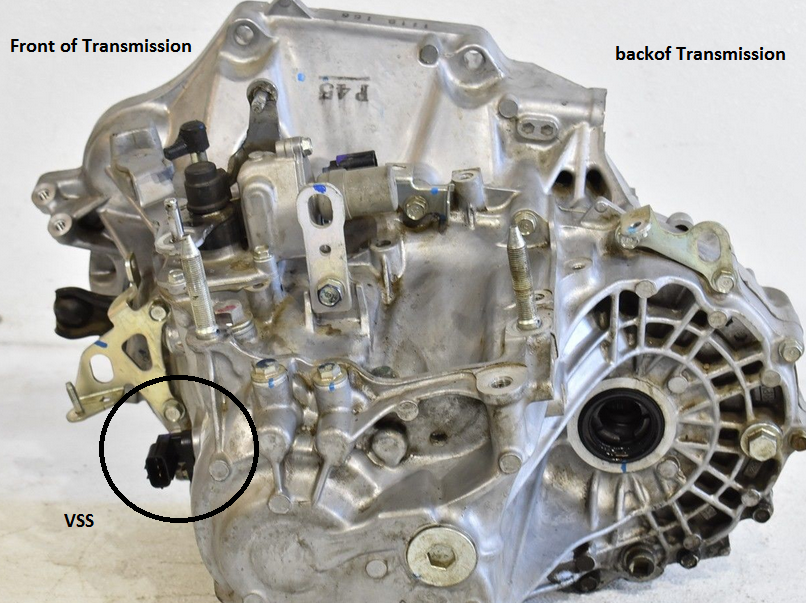
Lets have a look at two type of Honda transmissions. Olders ones have VSS on backside where as newer ones have on front side.So if you dont know about the year,just looking at it will guide you.
Image

Another view of a newer(2004+) transmission
Image


A view of older transmission having VSS on back side
Image


The newer VSS operate on 5volts and outputs a high frequency signal where as older ones operate at 12v and outputs a low frequency signal.
Image

Dont worry now HAsport also supports using k24 cheap transmission too.but those will need different mounts.So when you order your kit tell them which to send according to the transmission you will use.The engine block doesn't matter here.k24 or k20 engine block use same side bracket and location for HAsport kit. Only the transmission side that changes.
So if you are using the newer tranny,no worries.your Si wiring grip will bolton to it and speedometer aswell as VTEC and power steering(PS) will work fine.Yes you heard it right. VSS signal is a must for controlling all those features.

Lets now talk about the un-lucky who will buy/get older VSS transmission. There is a nice solution to that but with slight cost. 104$
Image


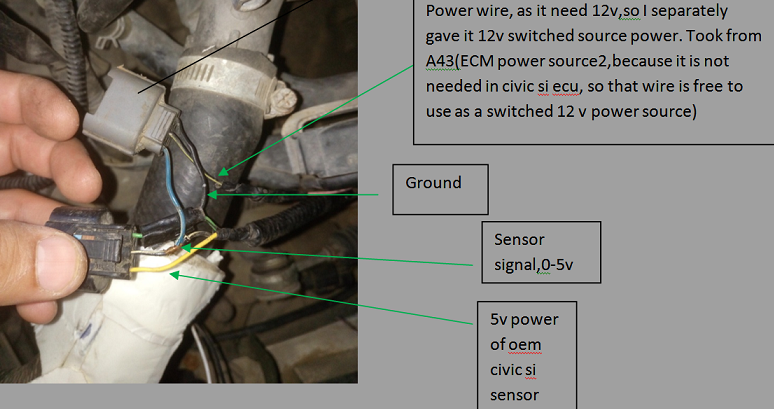
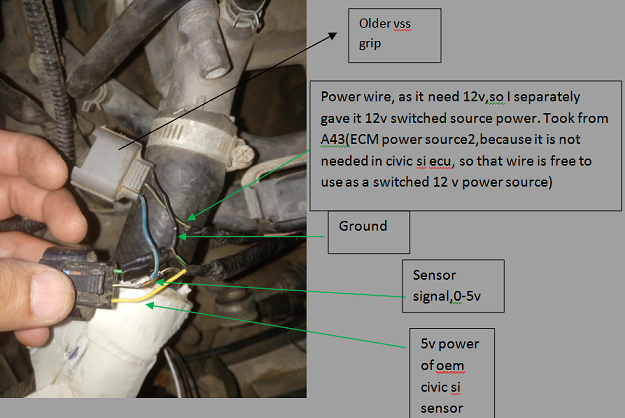
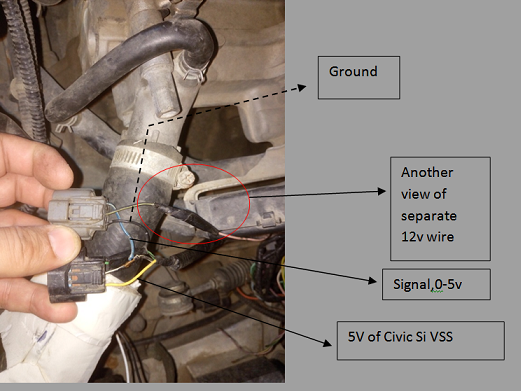
So i assume you have bought the older VSS sensor grip from junkyard/ebay. Lets wire it to the Si wiring VSS which already came with the wiring. S it need 12v instead of 5 volts which Si sensor grip provide,so we will give it a seperate 12v switched source from somewhere from your wiring.( In main diagram i mentioned some 12v switched sources in CRZ 124 grip,you can use one of those or an un-used wire which we extracted from CRZ ECU-A grip, A43 wire,ECM power source2).
Showing both grips.
Image


Image


Simply attach groung to the Si sensor ground and signal to the signal wire. and give a 12v switched power to older sensor
Image


Image


Also note that the wire colors of Civic Si wiring will be same for 2006-11 , but the junkyard grips which you will find may be from different Honda cars and colors may vary. In that situation you will match the location on the grip and verify the voltage. For example in below picture the grey grip is compatible with Older VSS transmissions but wire colors are different from above picture Grey grip.
Image


Now the next part :p * ( he he dont hate me plz,just doing my work as i promised that i wont leave any detail).
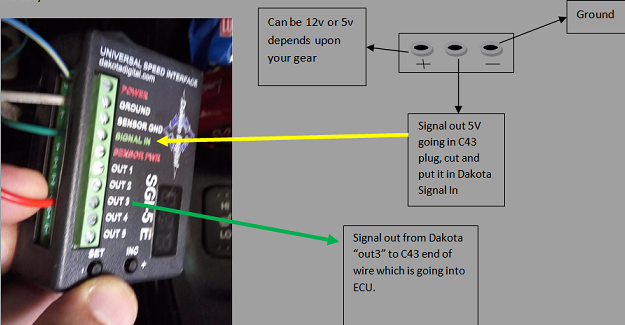
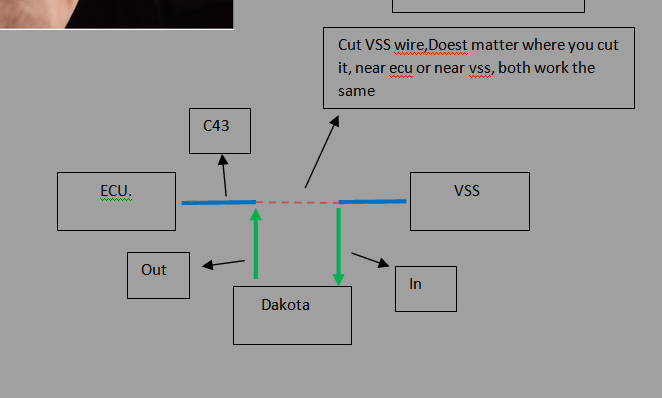
Now take the signal wire of the new wired grip , cut it and attach one end to Dakota and the other end to Dakota out signal wire as shown below
Image


Another diagram
Image


Another
Image


Now that the wiring is done.Lets configure the Dakota device to use function/application 7(L-H mode)
Image


Image


Nice.Now your work here is over.When CRZ is ready to drive you will need to callibrate it. Its easy and fun

Calibration.

Turn on your car and check for proper connections. The green led on the Dakota box should be flashing with your engine on.


Now get your friend and his car on the nearest highway. Pick a speed and have him set the cruise control. Now match the other car's speed and use the up and down buttons on the dakota box to set your Speedo to the appropriate speed. Holding the buttons results in a much faster adjustment.

Test your calibration with another speed. Happy VTECing :smile2:

A question I am very tight on budget righ now.cant spend 84$. but still want to run the car power steering and vtec.is there a way?
Yes there is a way.Under flashpro/k-tuner(not sure about k-tuner has this option as i havet tried it) menu choose 7000-10,000.The speedomter still wont work but all others things would.

Image


May be later on you can buy Dakota device and wire the signal wire through it.It will get working speedo.but than remeber to callibrate back that 7000-10,000 option you changed back to zero in your flashpro/k-tuner map
If you think this all VSS wiring was difficlut there is a hardware way to too it too. THat includes
Switching tranny case,
Drilling/tapping for the 02-04 sensor,
and gear swap.
Those are proven to work, but ultimately the labor, tools, and knowledge required. There are a lot of DIY's written already on these topics if you want to go that route.
Wiring part is over atlast. I coverted VSS at end because next i want ot prepare my transmission for swap.So its related and will continue from here.
 
Discussion starter · #49 ·
Any questions so far ? may be you guys understood it all or i may be I made it look difficult to understand at all?
I hope its the former not the later :|
 
Discussion starter · #51 ·
I couldn't ask any in the meantime as I had not hands on anything yet.

Btw, How much similarity of the wiring and steps as compare to JDM's DC5 Type R K20A swap?
it will work perfect.Matter of fact all the four swaps in our country before,were using JDM k20 type R's from either DC5 or Euro-R(FN2,.similar to FG2 k20z3).Mine was the 1st to use a k24.
I am using JDM k20 type R in my Honda Fit. The wiring is exactly same. Plus only sensor which is required is Oil pressure sensing unit as JDM engines don't have that but Civic Si ECU requires it.( On that note an interesting thing happneded. In my CRZ there was a engine code about VTEC pressure low,i checked the oil was fine and as you can see my VTec switch and solenoid are clean as new.)So i disabled the 'VTEC pressure switch' option is flashpro and it work perfect now). So i think it also is not needed.But to be safe why not addd the sensor while engine is out of car and later on if it is not requied turn it off from software.
No transmission change will be needed.i mean its just like swapping a k20z3 engine. i remeber in one of our CRZ k20type R DC5 swap Knock sensor grip needed changing.The wires were not changed only the plastic grip was grinded slightly to fit the Si wiring as it had plastic notch in a slight different location.
Matter on fact i may have pointed out earlier that this diagram can be used in modern Honda OBD-II cars in doing k-swaps. Just you need is ECU-A pinouts of that car and change them according to SI grip-A diagram. Other main wiring wires are only few which need a 12V swicthed source.and a DBW wire which can be traced out easyly as throttle body is just front of us and the throttle paddle inside the car.The Si wiring diagram will be same. Only in those otehr cars the c124 grip or other grip will be different.but you only need a swicthed 12v source in that and DBW wire and immoblizer.reverse cam will work as we add a seperate wire for reverse cam anyway.
Immoblizer programming will also be same.
 
Discussion starter · #52 ·
Transmission Preperatiion and Other Misc.Stuff

As i discussed in earlier post about the VSS ,lets prepare our transmission for swap.
Nothing major. We will just make sure we have all the things needed with us. For example some time during shipment the clutch slave cylinder or some other small parts get stolen/broken or the are not part of shipment from beginning. Don’t worry about clutch line if CRZ is manual. Same Clutch line will be used. In CVT/Auto, a universal line or steel braided lines can be used on your choice.
List of compatible transmissions.(engine block can be k20 or k24.doesn't matter)
Image


And now as HAsport also makes CRZ mounts for k24 transmission. Here is what k24 tranny can be used. The mount kit will be different. So contact HAsport for correct mounts kit ordering.
Image


Half shaft/Intermediate shaft of k24 are longer. Here is list of compatible half shafts. The half shaft length will effect the axle length. So when ordering axles do mention which half shaft you will be using.

Image


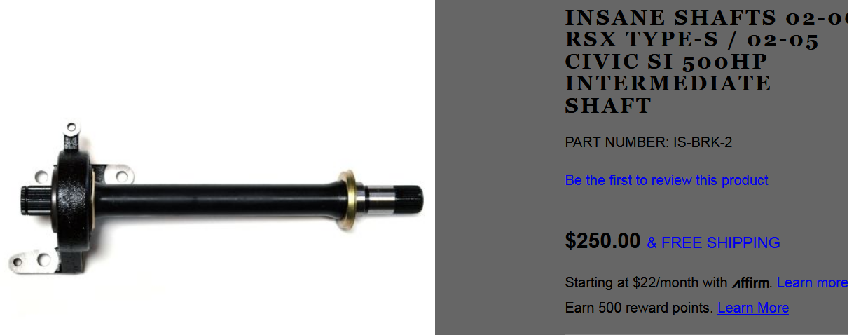
if you are ordering new one, a nice upgrade would be Insaneshaft intermediate shaft. Its a 100$ more but supports 500hp.
Image

Do confirm the fitment of it.
Image


New axles seals should be used. They are cheap.13$ and 11$
Honda Axle Seal (Drivers Side)Part Number: 91205-PL3-B01
Honda Axle Seal (Passenger Side) Part Number: 91206-PHR-003
If using k24 transmission with a k20 engine a covering plate is also optional for protection of dust entering the clutch/flywheel.
Part Number: 21351-PNA-000
and is of 15$ only. Pics shown on page two of this thread.
Axles and half shafts also have been covered on page2 of this thread. Also read that info

Plan already which Shifter and cables to use. Stock CRZ(Manual) shifter will work with Shifter calbes from 03-07 Accord with a V6 engine and 6 speed manual transmission.(its also known as Acura TL,as finding Accord transmission is difficult and expensive but Acura TL one's are plenty over ebay and cheaper).
Image

For CVT guys as you have to buy the shifter mechanish(Gear lever) and cables too,so the choice are more.You can order the DC5/RSX-S R shifter with its cables.Civic Si Fg2 shifter with its cables or a K-tuned one.
Update: March-2019: I just discovered that the OEM CRZ shifter and cables are also compatible with basr rsx or ep3 5 speed manual transmission and the transmission is a bolt on on HAsport mounths.i mean 5 pseed ep3 tranny has same bolt pattern like a 6 speed lsd tranny form a Tyoe R or RSX or a Civic si. So now you have a nother cheaper option and will also save cost of Type R shifter and labour. And you do not have to buy an Accord mnaul V6 6 speed gera as stated by HAsport. Details are found of
Image

Similarly if your trasnmission already have
Clutch Slave Cylender,no need to change. Do order Honda Urea greese to lube the clutch system and bearings.its 13$
Image


https://www.amazon.com/Genuine-Honda-08798-9002-Urea-Grease/dp/B00BFDFYKW

Transmission oil: For Transmissions having LSD: Order Honda MTF Advance protection 2L. (1.8l is needed for transmission).Or i heard good reviews of Redline and GM synchromesh too.
For Non-LSD ones. Simple Honda MTF is needed.(1.8L)
Do order a breather filter if using aftermarket intakes.
https://www.amazon.com/BQLZR-Intake...catcorr&keywords=Mini+Oil+Air+Intake+Crankcase+Vent+Valve+Cover+Breather+Filter

Clutch Paddle/Lines
Plus IF yours is a CVT , do order a Honda Clutch paddle(Honda CRZ,Jazz,Si etc etc) with its master cylinder. The modern Honda Clutch master cylinder(CMC) have a delayed valve in it. So this will be a good time to order a EM1 or EM2 CMC. I have found EM2 to be almost direct bolt-on on CRZ with almost no need to bend clutch lines.
Image

Some time the push rod is emitting from a metal extention.Try to match the OEm with similar one.
Image


Image

Image


Similarly for Right hand Drive CRZ's do order a Honda Fit GE8 break booster.(as i said earlier the CRZ break booster touches the engine, as its longer one). See page 2.
Now i will mostly cover the next part of swap which will involve taking out the CRZ engine and IMA system and putting K-Motor in CRZ. When you take car for swap you should have minimum fuel in the tank, as the tank will need to be lifted from one side so that IMA wire can be taken out from under Neath it. Before reaching the workshop get your Hybrid batteries fully charged. This will prolong the life of them outside the car, if you ever wish to sell them or put them back in your CRZ.
The rubber covering over clutch slave cylinder is mostly worn. DO order it. Only 10$ plus order Honda Urea grease(10$) and Clutch Pilot bearing(9$).Pics on Page 2

Temporary Header/Silencer: The engines come with short headers/exhaust manifolds. No after market company has made any headers for CRZ K-swap. DC sport headers for Civic Si FG2 are closest call but too near to under sway bar. and those are for Left hand Drive cars. For RHD(JDm,ASIA,UK) these will touch the steering assembly as so un-usable. RHD solution is ordeing a short header which sharply turns away from steering assembly.For example like this.
Image

Image

Order universal flex pipe too.without it the exhasut will leak after some time due to vibrations.
https://www.amazon.com/Interlock-Stainless-Steel-Flex-Pipe/dp/B009YMFLEA

And than custom made exhaust. 2.5" piping is fine. Do order a Resonator and Muffler of your choice.
Do heat warap them. Without heart wrapping i felt heat under my feet when driving my K-Swap Fit under hard driving. Use some heat scheild foil also on firewall.Like this.
https://www.aliexpress.com/item/12-...Sound-Absorption-Insulation-Aluminum-Foil-Cotton-Dampening-Mat/32345896265.html
Image


If the shop you are going to has custom exhaust facility too, than nice. But mostly the car must be towed to the exhaust shop. To save the cost you can drive to it too but the sound on engine without an exhaust will be deafening loud and might get you in trouble with Police.So i ordered a universal Catlytic converter and made a custom short temporary peice.
Image

Image

Here is what it looked like when installed.
Image

It did amazing job in dampening most of sound.

Ok lets do it guys.Load everything in the CRZ and you may need another car too as the stuff is abundant.The engine is heavy as whole.I recommend shifting tranny seperate and assmbling them togather at the workshop.
Also load 4 L Honda Long Life II coolant.Some thick engine oil for 1st startup like 10w40 mineral oil(4.5L). And later on 5w30 fully synthetic.(4.5-5L) Initially the engine may be dry so may be 6L is required to get oil levels normal.
Lets go to workshop for actual swap.....
Image

The Fit has k20R in it. It will be there to support the CRZ.:wink2: Plus the luggage capacity of Fit is huge. It will be carrying most stuff from home to workshop and back..
 
Discussion starter · #53 ·
At workshop

Just taking a moment with IMA and My CRZ alone. She is ready to go. A big day ahead. I already have installed the guages but sensors wires will pass from firewall when engine is out.thats why all read zero at this ttime
Image


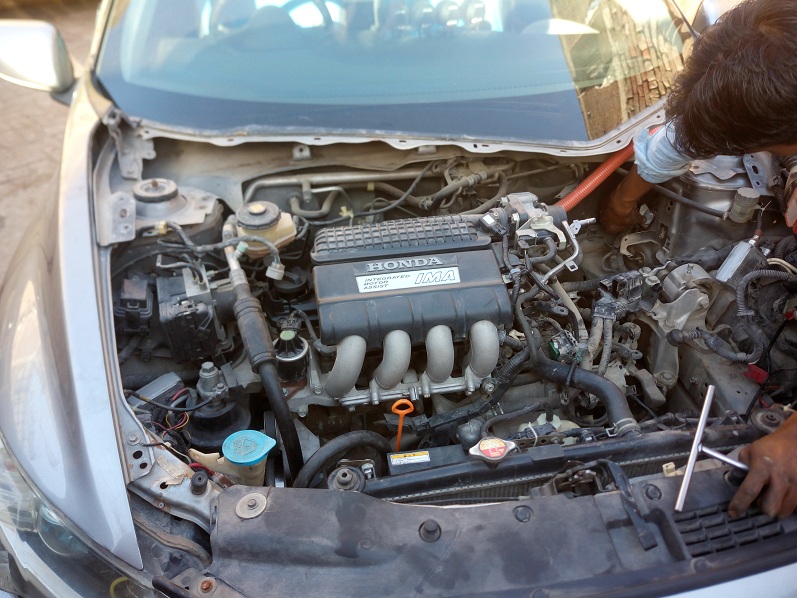
Having last long look on IMA and LEA MF6 engine.
Image


Arrives at workshop.The work begins soon. 1st the cowl schiled/wiper schield and under pannel is removed as we plan on installing engine from top.we dont have lift facilty.
Image

Image


Image

It do has its advantage that the radiator and bumper is not needed to be removed.Makes installation simple.

Good bye IMA
Image


Before disconnecting the wire in engine bay 1st turn off IMA system in the boot.The boot will not open when you have removed the car hood battery.So open the boot 1st before removing the front battery.

Image

Engine disconnected from all hoses and wiring. Mounts bolts loosened. ready to be taken out
Image


Be always careful becasue engine tries to hit windscreen from backside. Keep a person posted there to keep it away from breaking windscreen when engine is taken out of CRZ
Image


Make sure you have stored the AC gas before disconnecting the Ac compressor.Or let it escape and later can be filled with some $$.
Image


Lets take it out
Image
 
Discussion starter · #54 ·
The engine is out
Image


While the mechanics were preparing the k24 i quickly done rough ECU-A grip wiring. I plan on doing it neat once i reach home.
Image


Remember to label the wires taken out from ECu-A grip of CRZ.,if you ever gonna return back to stock,that will help reverse the wiring
Image


Already labelling wires will help doing it quicker.
Extra wires passed from Firewall hole already there.You dont need to drill a new hole
Image


I passed
Coolant sensor wires
Oil temp sensor wires
Oil pressure sensor wires
OBD-II WEN wire(althogh i did't need it later on i found out,2011+ CRZ's may need it )
Reverse cam wire
Aftermarket wideband guage wire
and i passed two extra just in case.

Next is IMA removal
Image


Its easy. Just keep opening every thing till it comes out. its staright forward.No hidden secrets or tips here.took near 30 mins. but taking out IMA wire will need some work under the body of car as it passes under the fuel tank
Image


IMA wire. The plastic covering of fuel tank is holded by few Plastic Push Rivets.Next we need only removal of left side bolts holding the fuel tank.One man holds fuel tank from left side while IMA wire is delivered from Boot and one man also needs pulling it from engine bay.So its a three man job. Remeber the less fuel in tank the more easy for the man holding it .
Image

Image

Good Bye IMA,i hope you will not be missed :wink2:
Image


Whille preparing the HAsport mounts
Image


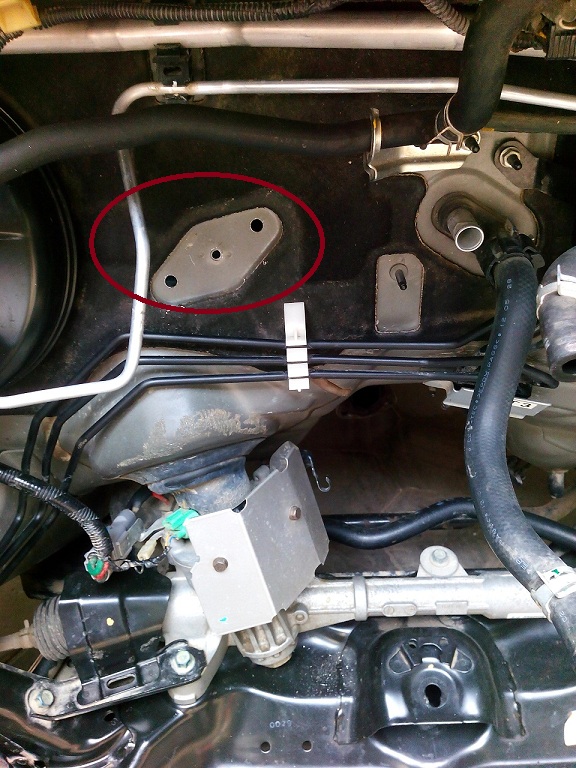
we found that one hole needed to drill a hole to pass a bolt from other side.
Image

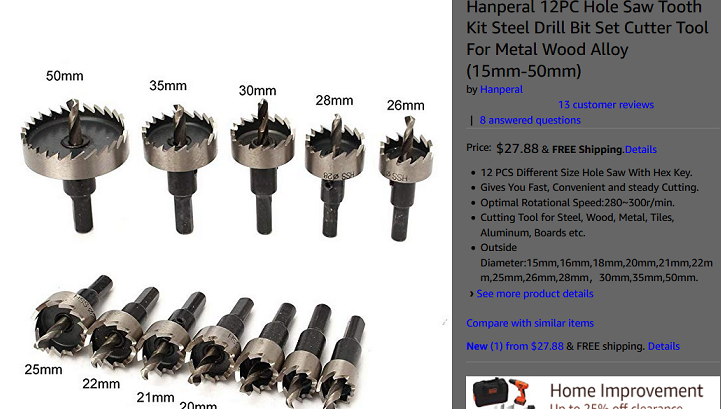
Hole drilled with a saw tyre drill bit.I told you earler to order one set.
Image

Good to carry with you in case the workshop dont have them.
Image


After pic of mount fixed
Image


Next fit the new break booster of yours is RHD CRZ. LHD and Honda FIt/Jazz dont need the new break booster.

Next you can do clucth master cylender if yours a CVT or you want to delete CDV in your manual CRZ.
Even in CVt/auto there is a place and marking in engine bar firewall side to where to drill and pass the clutch master cylender.so no need to worry about the mal-allignment etc
Image


After the CMC is fit and clucth line connected from this side.The other side will be connected to slave cylender once engine is in.This Pic is from My Honda Fit as it was converted from CVT to manual.
Image


Next will be taking out the older shifter cables and passing the new ones. If using stock CRZ shifter it will be less messy.
I will discuss those in next post
 
Discussion starter · #55 ·
Shifter

As i said earlier there is no sequence to these when engine is out. You can do what ever you want 1st.
I got my hands on a deal of Type R shifter and cables so i used them.(a lot of work needed as you will see in the pics.
I strongly recommend using Accord/Acura TL 2003-2007 V6 with manual transmission cables.Those will work with OEM CRZ shift mechanism and you wont have to go to all the hectic work i did. Lets see.
Image


OEm shiftter removed and new holes marked.We used metal plates to join the body and new DC5 shifter.
Image


Image


Image


Image


Image


Bolts fixed under the body.(Agghh... why we Pakistani's do things the hard way ??:|)
Image

Atlast the shifter fixed.
Image


We did slight mistake in judging the Shift/Gear lever position when in neutral.We did not put the plastic cover of gear when we were trial fitting the new shifter.As a result the gear is slightly to the left side,even when neutral.
Image

Although its in neutral it seems to be in 1st.
Image


But its not so bad when seeing from griver seat.
Image


Remeber to push plastic cover all the way to front till the holes in it allign. Or again the gear will seem in 1st gear although its neutral.
Image


Image


In the pic below i still havn't pushed the plastic all way fwd.So gear seems in 1st
Image


So you see so much work can be avoided by ordeing and using Accord cables. Another advantage is that you won't have to modify the shifter cables rubber under the chassis which prevent dust entering in cabin.
Image


Ok enough with shifter. Meanwhile i completed the wiring of 101 grip in the engine bay while mechanics were doing shifter work.
Image


Checking the continuetly of a sensor wire
Image

Image


Almost all wiring done.I will neat and tug it later when go back home.(remember we need to save as much time in workshop to save labour costs)
Image
 
Discussion starter · #56 ·
Guages wiring

There are many ways to wire guages. I did it before going to workshop but i think i need to share few details so that others may benifit from it.
Main things is to choose from where to get Guages 12v(memory),12v switched,12v dimmer(night mode power, and ground.
I have found a nice grip/connector which contains the all. Its the Hazard light grip.
Image

Image
/IMG]

Image


Confirming the voltages.The dimmer/light switch is the power that is On when the lights are turned on.
Image


And done. You can also take power from the navigation card box grip also,i showed it earlier somewhere.
Image


A Note: The modern guages can save the settings for so much longer time. My battery was draining. I did a valtage leak down test and found each guage was eating some .010 amps. So i disconnected their memory(constant power) and now every thing is fine and they retain the settings even when battery si disconnected).
Image
 
Discussion starter · #57 ·
K24 going in

Ok guys.the moment all waiting for.
Image


Still dangerously close to windscreen. No much details here.Its simple. We put it in.No problem occured.
Remeber to put engine belt on before.Its easy that way.
Now we need to adress some smaller issues now.One of them is AC compressor.
Ac compressor hitting subframe This will be needed in all the cars i think. LHD or RHD. You will either have to cut some metal here or bend it like i did. Cutting it makes it weaker. Bending keeps all the metal there.So its strong. No special tool needed. Just a large hammer. making metal heat up will make it easy.
Picture below showing k24 AC compressor
Image

Below is Rx8 compressor in another CRZ swapped k20, with custom made AC compressor bracket,but still needed the bending(slightly less but all the work and money spent of making custom bracket and buying RX8 compressor.So better use the one came with your k-engine and bend the metal.

Image


Next put the exles in and other pretty basic things like filling coolant or plain water at 1st.If no leaks than you can swap coolant later. Atleast have 4 Liters Honda Long Life-II coolant.
5 liters of oil for 1st start.thicker one.(10w40 mineral) we will drain it just after 1st engine warm up.
All coolant lines burbed for air in system.
AC gas filling.
etc etc.
AC Lines: One of CRZ AC line will work.(the upper one). For lower one that will becustom made.No exeption here.
Upper hose is very near to engine belt. USe some zip ties or better to fix it away
Image


Do note that HAsport moutns bolts have different lenghts. Be carefull to not mix them up. Place the mount with its respective bolts seperately.
Similarly the bolts which join transmission to the engine are all different lenght. Do mark them if you seperate tranny from engine for some reason for example clutch work etc etc.

Tip:
Manual transmissions dont have a oil checking dipstick. Transmission has a fill and drain bolt.K-series has 1.8L capacity. But can be filled from VSS hole, in which 4L can be put in.So be careful not to overfill it.
Image

When engine is inside car the fill bolt is very hard to reach.and some oil pump is needed to pour oil in. So better way is to remove VSS sensor and fill from there.but only 1.8L or 2L.(not 4L)
Image
(this is applicable to transmissions older than 2004,newer ones have VSS to front and have fill hole over top.So no problem with newer trannys).

Big brakes: I think CRZ brakes are plenty if stock rims tyres are being used. With bigger and heavier rim/tyres the ABS kicks in quickly as the brakes reach ABS threshold quicker. So the paddle feels like its working no more. I dont think the big brakes will help this situation. The solution is to turn off ABS completely and the car will brake like a champ. To turn off ABS just unplug a grip of ABS sensor. I find rear one is easy as its under the rear seat and inside cabin. The fronts are in engine bay and very hard to reach. Dont unplug ABS fuse(its seems easy to turn off this way but) the power steering also works with this fuse. So PS will not work if you unplug the ABS fuse.

Tip:
I forgot to mention earlier,have some spray paint with you. when engine is out,look for rusted areas. Sand them and than spray them good. They cannot be reached later when engine is in.Especially area where metal was bent for AC compressor.

Image


Almost ready. next i will post some radiator work and about radiator fans clearance. Next the car went from workshop to home with temperoray exhaust which i showed earlier. I did neat the wiring there. i will post ground and engine clearance next.and some minor details. Most of work is done . Now this thread can be used for k-swapping a CRZ or any modern OBD-II honda.(Civic,JAzz,Fit,City etc).Thanks all for bearing with my spelling mistakes as i dont have habbit to proof read.i have a very busy job and a family with three kids.
 
Discussion starter · #59 ·
Fuel lines

Congratulation! And thanks for the informative thread.

Btw, for the hasport mounting part, there is only 1 part that required hole to be drilled? what about other mounting pieces?
All other peices needed no modification. In my Honda Fit,the hole was not even there on both sides.So we drilled both sides of that chassis bracket.(just an info for Fit/Jazz guys doing this swap.

One more thing i forgot which should have beed adressed in above post is is the

Fuel Lines: One end of fuel line connecting to CRZ fuel line is same and is smaller (1/4") .No need any change. The other end will couple with k-engine which has a bigger bore(5/16"). luckyly my engine came with cut end of its fuel line. So we detached the plastic coupling from it and put it over CRZ fuel hose and we were done. But fitting it over is tricky as there are hard plastic lines. So slightly less heat and they wont fit and slightly more heat and they will melt. And fuel hose/line lenght is not much,so margin or error/tries is just one or may be two. If the line is melted you will have to cut short that part.
Image


I have noted that instead of flame, a heated gun would do nice.or hot boiled water. Or you can buy this tool and do it professionally but it cost 60$
The Tool
Image


Note: CRz/Honda JAzz/Fit has 1/4" fuel quick disconnect size where as K-series fuel rail has 5/16". Useful for those who want to use after market parts or convert to -AN fittings or a return fuel system.
1/4" equals -4AN
5/16" equals -6AN
There is hole left in trunk where IMA wire used to pass. Close that up.
Image


Not a good way to close,but you can be creative here.
Image


Or If you plan on shifting the battery to boot leave the IMA wires there. They are plenty thick and 4 wires. So very easy and convenient to shift car battery to rear.

Back to Home.Dirty but that is easy to correct ;)
Image
 
Discussion starter · #60 ·
Radiators/Fans/Hose

Although the choice of radiators is wide.Aftermarkets need some fabrication to fit. As i mentioned earlier OEM CRZ or FIT radiator is more than enough. Similar is case with hoses. You can use steel braided or custom made as you wish. But i have found the upper TSX radiator hose which usually comes with engine works very well for k-swap upper hose.(2004-2008)
Image

Another pic to show the shape
Image

Image


For lower radiator hose: There could be many options again but i have found after trying many that Suzuki Swift Upper radiator hose works best as CRZ lower k-swap radiator hose.
Image

Its a loose 'S' shape hose
Image


I have shown pics so that one can get idea when ordering the hoses.
The lower hose i mentioned is for the RSX-S waterbody jacket which is shaped downward.or a similar option like k-tuned/aliexpress.
One picture i am posting here.
Image

Details and other pics on page1 ,

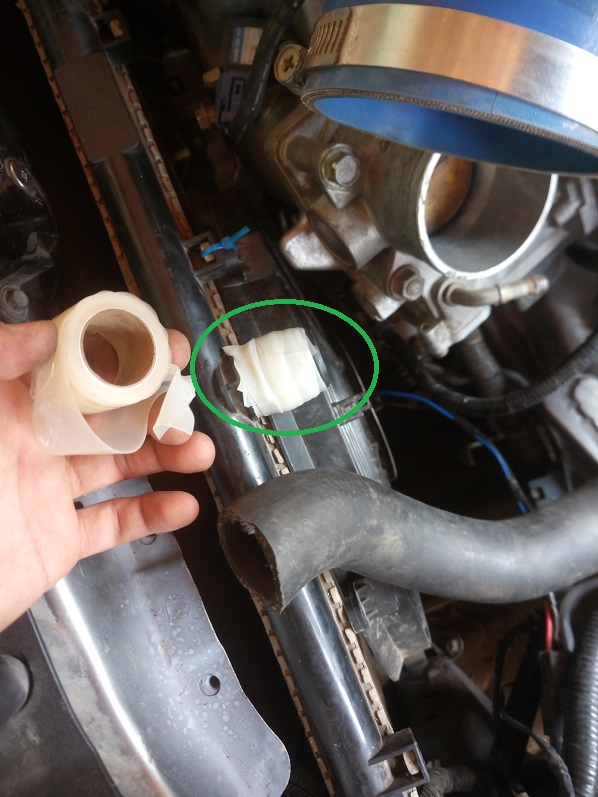
The upper tsx hose is slightly wider than OEM CRZ radiator.The solution i found is Silicone Repair Tape from amazon.Its work very well. or this
Image


In below pic,the hose seems slighly kinked.That was solved by cutting it short slightly.Plus once it get hot the kink is gone.
Image


The above picture was taken when i was using slim fans on both sides.Now we have shifted radiator forward,so one slim fan and one OEm fan with its shroud is being used.

Radiator Fans: The OEM fans works well.but the clearnce is very little on Ac compressor side.On that side either you have to mount fan outside the Ac condensor(one fan will be inside,other would be outsdie near font bumper). Or you will have to use a Slim fan on Ac compressor side. Still the clearance is little on Ac compressor,rather lower AC line.So it depends upon how your mechanic passes the new AC line. We shifter radiator and Ac condensor 2 inches fowrward. A lot of fabrication was required but now clearance ok
Image


Its a slim fan but still Ac line clearance is just acceptable.(we moved radiator 1.5-2" forward but still.So you can imagine without shifting radiator forward OEM style fan with shroud is out of question,on Ac lines side.On other side the OEm fan with shroud fits fine and clearance is excellent)
Image


The coolant reservoir also need slightly moved toward OEm fan side.
Image

Image


Next i will post about the Evap system. and how i fitted the plastic gear box over my typeR shifter.
Meanwhile lets enjoy our new cool ride ;)
Image
 
41 - 60 of 143 Posts