Honda CR-Z Hybrid Car Forums banner

My experience installing the Honda arm rest

18K views 21 replies 15 participants last post by  CRZJIM  
#1 ·
I wanted to share my experience after installing the OEM arm rest. DISCLAIMER: Please - if you're not comfortable with this procedure do not attempt/don't hold me liable if you mess something up. I'm simply sharing what I did to my car for entertainment purposes. I hope that doesn't make me sound like a tool...

As others have done before, I also installed the arm rest without removing the entire center console. I was reluctant to remove the console/etc because I didn't want to damage anything or create rattles.

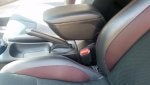
Although I don't consider it an exotic tool, if you don't have one, you'll need to get an articulated socket extension:

Image


As you can see, the articulated extension allows you to get at the bracket bolts without removing the console.

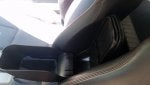
In order to move the wiring harness out of the way, cutting the harness clip is needed. Side cutters work well, and I suggest cutting the clip with the bracket between the cutters and the harness. By using the bracket as a "backer" you avoid the risk of damaging the harness with the cutters:

Image


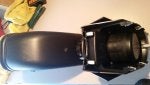
In order to install the arm rest mounting bracket, I decided to disassemble the e-brake cable. Although you may be able to get the bracket into position without disassembling the cable, it was just too easy. Here's a picture of the important parts:

Image


To disassemble the cable, remove the nut that attaches the brake handle to the pair of cables. I used a ratcheting box-end wrench to speed the process of removing the nut. The space only allows for maybe one click, but it still doesn't take long to remove the nut completely. Once the nut is removed, the central cable can be separated from the pair of cables. Pay attention to how the central cable is attached BEFORE pulling the cable out so you can reassemble it! Also, be sure to note the tension (or lack thereof) in the cables before removing the central nut. When reassembling the cables, too tight will have the brakes dragging all the time. Not tightening the cables enough may reduce your e-brake effectiveness.

Once the pair of cables are separated from the handle cable, the bracket can be easily slid into position. The rest of the install is really pretty easy, so I won't bore you with further details. Reassembly of the brake cable assembly is simply the reverse procedure as the disassembly process.

Again, I'm just sharing my experience in case somebody was considering this install. I hope the pictures help.
 
#2 ·
I don't know why the pictures aren't showing (they showed when I first uploaded them here), but they're in the gallery under my name. At least you can see thumbnail-sized pics there...
 
#8 ·
Yes - the holes were drilled with the console in place. I used a sharp hole-punch along with the already-installed metal bracket to locate the holes for drilling. Although my method of locating the holes was different from the instructions (I didn't use the little "crosses" in the plastic), my punch holes lined up with the "crosses". The whole install was done with both seats pushed all the way forward, so there was plenty of room to drill the holes.

I used spade bits (the kind with wide, flat "wings") to drill the holes - the kind that you would use to drill larger holes into wood. A spade bit is not the ideal bit to use for this type of material, but I took my time and was very careful.

To be honest, the resulting holes weren't that pretty (kind oval-shaped) but the rubber plugs made everything look nice once they were installed. I wound up trimming the melted edges of the holes with a razor knife so the plugs fit cleanly.

I can't remember what size bit(s) I used (spade bits are in inches), but it was fairly close to the metric size(s) called for in the Honda instructions. I suggest using new, sharp bit(s) for drilling the holes.

Take your time and good luck with your install.
 
#9 ·
I just thought of a possibly better option for drilling the holes.

I dug up one of those "cone" bits the other day and thought it would cut a nice clean hole. Don't know why I didn't think of this kind of bit when I was installing the arm rest...

Again, I can't remember the inch equivalent diameter, but I assume the cone bit has the needed diameter in its range. I'll dig up a link for those that don't know this kind of bit.

EDIT: I found a link at Lowe's. For the price (yikes), maybe this isn't a very good option. Cuts a nice clean hole, though...

http://www.lowes.com/pd_27992-281-10234_4294707818__?productId=3070405&Ns=p_product_qty_sales_dollar|1&pl=1&currentURL=%3FNs%3Dp_product_qty_sales_dollar%7C1&facetInfo=
 
#12 ·
Thanks again Goose! :thumbup:
Finally ordered the armrest and I managed to get it installed today without removing the center console. I was able to get the e-brake cable off without undoing the nut on it by chocking the wheels and putting the e-brake lever in the off (forward) position.
Also, I marked the holes from the inside where the crosses are with a probe heated in a lighter flame. The front holes are close enough to 1/2" and the rears to 3/4" that fraction size bits will work.

Having small hands and long skinny fingers will definitely be helpful, mine aren't.

Time to go road test my new armrest!
 
#13 ·
You're more patient than I am with regards to not removing the brake cable nut. Others have installed the arm rest bracket without moving the cables, but it's a pretty tight squeeze.

There's no question that releasing the e-brake makes the install easier. Since I have a CVT, I neglected to note this step - thanks for pointing this out for others. Chocking the wheels is also definitely a good idea.

For those that are interested, I've seen those stepped drill bits at places like Harbor Freight Tools for cheap - like ten bucks cheap. They may not be the best quality bits, but they'll do the job for a few holes in plastic. :)
 
#14 ·
Success!

I used the shortcut detailed here to get the console installed. It took me quite a while.

Notes:

I don't have the angled socket but a friend managed to pull the sides back far enough that I could get a small socket with extender in there and pull the bracket bolts out.

I did just pull that one E-brake cable out which made sliding the console bracket in fairly easy.

I didn't understand why I had to remove the plastic grommets until I tried getting the bracket in there, so I had to pull the bracket back out and break the plastic bits as instructed. They were just getting in the way.

BUT, once I got everything tightened down inside, I attached the new console and found that the holes weren't lining up with the bracket inside. I needed to go back in, loosen the bracket bolts and jam that thing as far forward as possible (there is just enough leeway in there that makes a difference) and tighten the bolts back down. That fixed the registration problem up mostly. I got the two console bolts on the driver's side in fairly easily. But the passenger side I could only get the back bolt in. The front hole wouldn't line up and was being blocked by the rectangular holes on the metal bracket inside. Battening down the three I could get in seems to hold the entire installation in sufficiently so I'm not going to worry about the missing fourth bolt.

I'm not that mechanically gifted, so this entire thing took me a couple hours, but part of that was just trying to understand the directions. But it looks great!

Thanks for the help!
 
#15 ·
Goose, I too used your instructions and my armrest install went very well. Just took me a while to sort out how to get the cup holder off the d&*m console. I also used a Unibit and found that 9/16 and 13/16-7/8 worked great and made nice, clean holes. When things warm up a bit it on to stuffing the sub. Thanks for the DIY sorta post Goose!
 
#18 ·
Useful tips in this thread, I installed the armrest this morning. Easy install except for the confined space, no idea why Honda recommends removing the centre console. Got mine for the equivalent of $107 delivered. A definite bargain, this part should be installed as standard.
 
#20 ·
Just installed my armrest! Few things that weren't clear to me that could help others who decide to DIY:

1. The new armrest bracket does not replace the current OEM bracket. Instead it goes directly on-top of it. I spent like 15 minutes trying to pry up the bracket until I realized that I was being dumb.
2. To remove the cup holder (which is the first step) you need to locate the tiny indent on the passenger side of the rear cup holder. Gently work a screwdriver into the indent and begin to separate the cup holder from the center console.
3. There are two tiny crosses on the inside of the center console (one on each side). You need to punch a hole through the center of them so that you can drill your new holes from the outside of the console. I used a scribe tool. The key is to use a lighter to heat up the tool which will aide you in getting the poking tool through to the other side.
4. All three plastic clips need to be removed from the original bracket before install. You can use the side cutters on the lower one. The other two were very difficult for me to get done. I ended up pinching them with pliers and pushing them out... but be prepared to fight them (this was the worst part for me).
5. It's a real pain to work behind the seats. Even if you push the seats all the way forward. I ended up having to take a stretch break every 15 minutes to help my back.

Took me 3 hours from start to finish. Struggled mightily given the space constraints and I am below average on handiness. Good luck!
 
#22 ·
Just finished the install for the armrest. Thanks all for the tips. Saved a ton of time and money. Did NOT remove the center console. Removed the cup holder and loosed the armrest bracket attachment. Loosed the emergency brake cables. Boy the cramped quarters was PIA. Everything lined up pretty close and came back together nicely. Total install time about two hours.
 
#23 ·
Aftermarket armrest

First post-first mod-new owner......thought I would share my experience installing my inexpensive armrest option. Didn't want to spend the big bucks and found this universal one on Amazon. I was skeptical at first but it really turned out well.

I used all the original hardware except the wing nuts. Replaced those with nylon lock nuts.

Just pull the back drink holder part off and bolt it onto the armrest. Took me about an hour to do.

https://www.amazon.com/gp/product/B00XHK5U5K/ref=ppx_yo_dt_b_asin_title_o01_s00?ie=UTF8&psc=1

Just pull the back drink holder part off and bolt it onto the armrest. Took me about an hour to do.
 

Attachments