Introduction
This write-up will detail how to change the LEDs in our steering wheel controls. The controls have a yellowish-green backlight and appear out of place when compared to the other accent lighting in the interior. I will describe the process of changing the LEDs in the spoke mounted clusters (Audio / Cruise control), as well as the base mounted clusters (Bluetooth / Info).
Side note
For a cleaner look, I decided to delete the Cruise control buttons (which I never use) and relocate the Information buttons to their location. More info on this can be found here. Although I didn’t change the LEDs in any base mounted cluster, I will still describe the process.
Important disclaimer
It is important to note that this modification involves soldering and the removal of soldered components from a circuit board. It also involves removal of the airbag system from the steering wheel and the disassembly of the steering wheel switches, so caution is advised. Although this is not a particularly difficult mod, safety should always be a priority. This mod was done on a 2012 model, so I’m not sure how this applies to the S+ button assembly.
What you will need
Type 1208 LEDs (3mm x 2mm) for Audio / Cruise control. Can be purchased here from L.C.LED in the colour of your choice. 3 LEDs per switch assembly.
T1 3mm LEDs for Bluetooth / Info. Can be purchased here from L.C.LED in the colour of your choice. 3 LEDs for Info assembly and 2 LEDs for Bluetooth.
Soldering equipment (soldering iron, solder, solder wick etc)
Socket wrench with extension, 10mm socket, 14mm socket and Torx T30 bit.
Phillips screwdrivers
Remove steering wheel
1. Make sure your front wheels are pointing straight ahead and the steering wheel is straight as well. This will help when you reinstall the steering wheel later on.
2. Disconnect the battery (10mm socket) by removing the negative terminal first, then the positive. The service manual insists waiting at least 3 minutes before proceeding with removing the airbag.
3. Locate and remove the access panel on the bottom of the steering wheel. Then disconnect the yellow connector for the airbag and black connector for the horn. (I turned the steering wheel to take the photo below, this was after the install)
![Image]()
4. Remove the two Torx bolts (T30 bit) located on each side of the steering wheel. Then carefully remove the steering wheel airbag.
![Image]()
5. Disconnect the steering wheel wiring harness. It’s the large white plug in the centre of the steering wheel, below the steering wheel bolt. Don’t be too forceful with the wires.
6. Loosen the steering wheel bolt (14mm socket + extension). You might need someone to hold the wheel for you. Alternatively, you can turn and lock the wheel; just note its position. Leave the bolt threaded on, it will prevent the steering wheel from hitting you in the face. Then pull the steering wheel loose. This required some force in my case. Pulling at the 9:00 and 15:00 positions worked best for me. Remove the bolt and the wheel.
Remove controls
7. With the steering wheel out of the car, remove the two screws at the back (circled below). Then take the back cover off. The arrows below indicate where the cover is clipped onto the frame.
![Image]()
8. Remove the rear covers over the Bluetooth and/or Information controls by simply pulling them off.
![Image]()
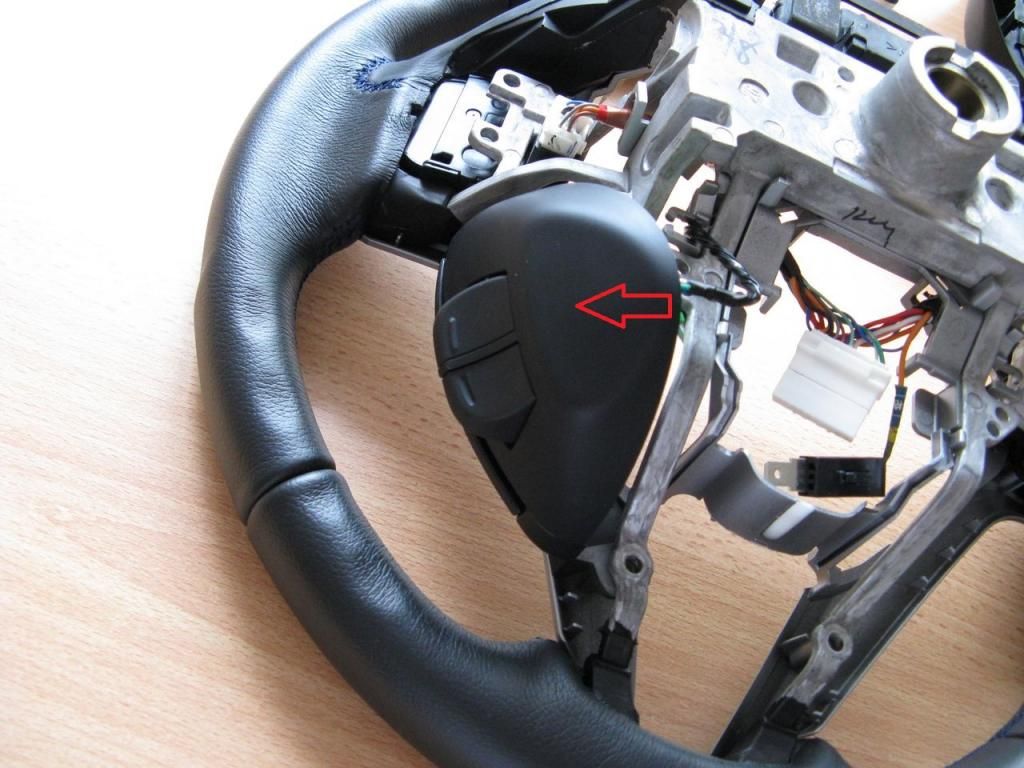
9. Remove the ground screw that the wiring harness is attached to, as well as the screws holding the trim piece in place. Then pull the silver trim piece (with the attached controls) out.
![Image]()
10. On the back of the removed trim piece, unplug the control assemblies. Remove the four screws holding all the controls in place (circled below). Then remove the controls.
![Image]()
Change audio/cruise control LEDs
11. This is where things get complicated. These controls have six clips keeping the rear cover in place (two are indicated below). Ideally, you should remove the rear by unhooking all these clips. I say “ideally” because there was no way for me to do this without breaking something. Luckily I had a few second hand spares to practise on. If you are able to remove the back this way, go for it. Otherwise you can do what I ended up doing and use a Stanley knife to cut the clips off. This way the back slides right out. I then filled the indents with glue (gel type super glue) to act as the clips after reassembling. Just make sure your LEDs work before gluing everything together.
![Image]()
12. With the control disassembled, you will have access to the circuit board. The image below shows how the LEDs look that need to be replaced. There are three LEDs on the audio controls, three on the cruise controls and two on the spoke mounted info controls. Also take note of the diagram next to the LED unit indicating positive and negative direction. These surface mounted LEDs simply need to be de-soldered and replaced.
![Image]()
13. After the LEDs are replaced, test the unit to make sure they all light up. To test, I connected just the wiring harness back to the car with the controls, grounded the harness to the steering wheel shaft, reconnected the battery and turned on the lights. Below are the standard lights compared to the new white lights. They are a bit bright, but honestly the standard ones are useless. Naturally you can use any colour you like.
![Image]()
![Image]()
14. Optional. I found the grey rubber diffused the white light in a way that made it appear off-white. To overcome this I cut open the rubber sections covering the LEDs. Just note that this will increase the brightness as well.
![Image]()
Change Bluetooth/information control LEDs
15. These controls are considerably easier to disassemble compared to the ones above. Start by removing the two small screws (circled below) in order to remove the cover attachment. Then remove the one larger screw (also circled below) to get the metal bracket off.
![Image]()
16. Remove the main buttons by unhooking them from their pins. The arrows in the image below show where the buttons are clipped in. Then remove the two screws (circled below) holding the circuit board in place.
![Image]()
17. Now you can remove the circuit board by pulling it out. If it’s a little stuck, pry the corners loose where the blue arrows are pointing. The red arrows below show a closer look at the pins where the buttons where clipped in.
![Image]()
18. With the circuit board completely removed, you can now change the LEDs pictured in the image below. These are through-hole mounted so would need to be de-soldered from the bottom of the circuit board and then replaced. There are three LEDs on the info controls and two on the Bluetooth controls.
![Image]()
![Image]()
19. Remember to test these controls as with the audio / cruise controls before reassembling. I didn’t change these LEDs, as I deleted these controls, so I don’t have any images of how they look.
20. Reassemble and reinstall everything in the reverse order. Here’s my finished product with the white LEDs.
![Image]()
![Image]()
![Image]()
![Image]()
I hope this helps those out there who commented on the steering wheel illumination. For any questions or comments, let me know.
This write-up will detail how to change the LEDs in our steering wheel controls. The controls have a yellowish-green backlight and appear out of place when compared to the other accent lighting in the interior. I will describe the process of changing the LEDs in the spoke mounted clusters (Audio / Cruise control), as well as the base mounted clusters (Bluetooth / Info).
Side note
For a cleaner look, I decided to delete the Cruise control buttons (which I never use) and relocate the Information buttons to their location. More info on this can be found here. Although I didn’t change the LEDs in any base mounted cluster, I will still describe the process.
Important disclaimer
It is important to note that this modification involves soldering and the removal of soldered components from a circuit board. It also involves removal of the airbag system from the steering wheel and the disassembly of the steering wheel switches, so caution is advised. Although this is not a particularly difficult mod, safety should always be a priority. This mod was done on a 2012 model, so I’m not sure how this applies to the S+ button assembly.
What you will need
Type 1208 LEDs (3mm x 2mm) for Audio / Cruise control. Can be purchased here from L.C.LED in the colour of your choice. 3 LEDs per switch assembly.
T1 3mm LEDs for Bluetooth / Info. Can be purchased here from L.C.LED in the colour of your choice. 3 LEDs for Info assembly and 2 LEDs for Bluetooth.
Soldering equipment (soldering iron, solder, solder wick etc)
Socket wrench with extension, 10mm socket, 14mm socket and Torx T30 bit.
Phillips screwdrivers
Remove steering wheel
1. Make sure your front wheels are pointing straight ahead and the steering wheel is straight as well. This will help when you reinstall the steering wheel later on.
2. Disconnect the battery (10mm socket) by removing the negative terminal first, then the positive. The service manual insists waiting at least 3 minutes before proceeding with removing the airbag.
3. Locate and remove the access panel on the bottom of the steering wheel. Then disconnect the yellow connector for the airbag and black connector for the horn. (I turned the steering wheel to take the photo below, this was after the install)

4. Remove the two Torx bolts (T30 bit) located on each side of the steering wheel. Then carefully remove the steering wheel airbag.

5. Disconnect the steering wheel wiring harness. It’s the large white plug in the centre of the steering wheel, below the steering wheel bolt. Don’t be too forceful with the wires.
6. Loosen the steering wheel bolt (14mm socket + extension). You might need someone to hold the wheel for you. Alternatively, you can turn and lock the wheel; just note its position. Leave the bolt threaded on, it will prevent the steering wheel from hitting you in the face. Then pull the steering wheel loose. This required some force in my case. Pulling at the 9:00 and 15:00 positions worked best for me. Remove the bolt and the wheel.
Remove controls
7. With the steering wheel out of the car, remove the two screws at the back (circled below). Then take the back cover off. The arrows below indicate where the cover is clipped onto the frame.

8. Remove the rear covers over the Bluetooth and/or Information controls by simply pulling them off.
9. Remove the ground screw that the wiring harness is attached to, as well as the screws holding the trim piece in place. Then pull the silver trim piece (with the attached controls) out.

10. On the back of the removed trim piece, unplug the control assemblies. Remove the four screws holding all the controls in place (circled below). Then remove the controls.

Change audio/cruise control LEDs
11. This is where things get complicated. These controls have six clips keeping the rear cover in place (two are indicated below). Ideally, you should remove the rear by unhooking all these clips. I say “ideally” because there was no way for me to do this without breaking something. Luckily I had a few second hand spares to practise on. If you are able to remove the back this way, go for it. Otherwise you can do what I ended up doing and use a Stanley knife to cut the clips off. This way the back slides right out. I then filled the indents with glue (gel type super glue) to act as the clips after reassembling. Just make sure your LEDs work before gluing everything together.

12. With the control disassembled, you will have access to the circuit board. The image below shows how the LEDs look that need to be replaced. There are three LEDs on the audio controls, three on the cruise controls and two on the spoke mounted info controls. Also take note of the diagram next to the LED unit indicating positive and negative direction. These surface mounted LEDs simply need to be de-soldered and replaced.

13. After the LEDs are replaced, test the unit to make sure they all light up. To test, I connected just the wiring harness back to the car with the controls, grounded the harness to the steering wheel shaft, reconnected the battery and turned on the lights. Below are the standard lights compared to the new white lights. They are a bit bright, but honestly the standard ones are useless. Naturally you can use any colour you like.


14. Optional. I found the grey rubber diffused the white light in a way that made it appear off-white. To overcome this I cut open the rubber sections covering the LEDs. Just note that this will increase the brightness as well.

Change Bluetooth/information control LEDs
15. These controls are considerably easier to disassemble compared to the ones above. Start by removing the two small screws (circled below) in order to remove the cover attachment. Then remove the one larger screw (also circled below) to get the metal bracket off.

16. Remove the main buttons by unhooking them from their pins. The arrows in the image below show where the buttons are clipped in. Then remove the two screws (circled below) holding the circuit board in place.

17. Now you can remove the circuit board by pulling it out. If it’s a little stuck, pry the corners loose where the blue arrows are pointing. The red arrows below show a closer look at the pins where the buttons where clipped in.

18. With the circuit board completely removed, you can now change the LEDs pictured in the image below. These are through-hole mounted so would need to be de-soldered from the bottom of the circuit board and then replaced. There are three LEDs on the info controls and two on the Bluetooth controls.


19. Remember to test these controls as with the audio / cruise controls before reassembling. I didn’t change these LEDs, as I deleted these controls, so I don’t have any images of how they look.
20. Reassemble and reinstall everything in the reverse order. Here’s my finished product with the white LEDs.
I hope this helps those out there who commented on the steering wheel illumination. For any questions or comments, let me know.